Wednesday, November 3, 2010

Nice Grill, You Maker

I really love the DIY/Maker trend (though self sufficiency's been around for a bit). I remember the first time I saw Readymade magazine. This, I thought, is the type of design, ingenuity, and self efficacy I espoused to have in my life.

Anyway, Make magazine has also taken on the task of inspiring and showcasing Makers' work, and this cool grill made from sheet metal and end caps is one example. I can imagine a 6-foot version lining the table for a party - build and pull your kebob as you like.


From Make Magazine.

Sunday, July 25, 2010

Oh $#@%, My Captain!

Taking on Water (the engine and pontoon in the foreground is sinking)

Day 1: Tuesday, July 20

Last Tuesday morning started like any morning. I got to work early hoping to get some writing done. The am hours were clipping along quite well until I receive a call at 10 o'clock. It was the marina manager who told me, "I hate to tell you this, but your boat is taking on a lot of water." I immediately left for the marina, drove who knows how fast, and arrived to find the boat dramatically tipping up on the front right-hand side.
"What do I do?" I wondered. What would you do? I had no idea. Fortunately, the water had not reached the deck, but who knows how long until it did. I knew that I had to drain the pontoons, but how? I was going to get that lesson from the previous owner when they returned from a trip to Mexico. That wasn't until the 25th, and this was the 20th. I searched through the closet, found what looked like a miniature pump (it had two places to attached a hose, one labeled "in" and the other "out"), loosed what I knew to be the pontoon plug, and got to work.
In the meanwhile, I needed to figure out how I would get the pontoon fixed. That required getting it out of the water, but we don't have a trailer. The marina manager suggested Wain (not Wayne), a guy who works at a nearby welding shop. I called Wain, but he didn't think his trailer would work. I call three other places: one was retired, another had a trailer but it was out west, and the third didn't think his trailer would fit our boat. I called Wain back, and he agreed that we could give his trailer, with some modifications, a try the next day.
The rest of Tuesday, I prepared the boat for an overnight stay. I was able to fix the air conditioner. (I can't give myself too much credit, because I really don't know what I'm doing. I just opened the cover and pushed on what looked like a suspended drum. That apparently loosened it enough to get it spinning and cool air blowing.) This was the first night any of us had slept on the boat, and this wasn't the type of occasion I had in mind. I just wanted to be able to monitor the amount of water that came back in the pontoon.
The "slumber party of one" was fine. I dug out my old Nintendo Entertainment System (the old 1985 console) and a few games, hooked them up to an old tv and basically just hung out. That morning, I boiled water for the coffee percolator on the grill. I also baked a few eggs over some sausage I cooked in a cast iron pot. Under other circumstances, it would have been the perfect morning meal on the boat.
Getting the Boat out of the Water

Day 2: Wednesday, July 21 Wednesday was pretty low key. I pumped more water out of the pontoon, went back to the house to get cleaned up, and began assessing what work I would want to get done on the boat while it was dry docked. The marina gave me a one-week permit to be parked near the dock. After that, I would have to beg for a few more days or move the boat elsewhere. What could I do in a week? Well, I knew I wanted to:
  1. repaint the railing and railing panels,
  2. repair the outside decking,
  3. lay new carpet, and
  4. fix the gas line for the oven and hot water tank.
The interior needs work, too, but I figured the four tasks I listed above would be easier to accomplish with the boat out of the water. And I was actually looking forward to beginning the restoration process. In fact, I recognized that I was building a weird relationship with this vessel that had just about did me in. It was as if I had been presented with an immense challenge I was determined to accomplish. It was either the boat or me. (I never read Moby Dick, but I imagine that the sailor had a similar fear/respect/admiration for that karn-sarn whale. The sailor doesn't die in the end, right?)

That evening, Wain called for me to meet him out at the dock. There, he had the trailer hooked to the front of his tractor, which he was able to drive further into the lake to load the boat. It just took two tries for me to get the boat on the trailer. It was a tight fix, and navigating that boat is definitely an acquired skill. He slowly pulled the boat up the ramp to the spot where it finally rested.
Now, the next challenge was bracing the pontoons on the left-hand side. Since there was still so much weight in the boat, it was buckling the entire structure. The only part of the boat resting on the trailer was the middle section. The pontoons hung out on the sides, unsupported. I raced to a few different stores and finally found the proper 3 ton floor jack. I picked up a couple of friends and headed back to the boat. By dark, we had the pontoon properly blocked.

Day 3: Thursday, July 22
Around 1:30 am, my dad arrived from Missouri. My mother had already been here helping us take care of our daughter while her daycare is closed for a two-week vacation. That morning, my dad and I got to working labeling and removing the railing and panelings around the boat, tearing up the carpet, and assessing the plywood decking. That afternoon, I wasn't able to work on the boat because I had to finish writing and submitting a conference presentation proposal. Later that evening, we took a break and went to 17th Street BBQ for dinner and another hardware store to check about outdoor carpet. I finally got a hold of my engine guy, Jerry, and made plans to meet him at the boat on Saturday morning.

Day 4: Friday, July 23
Today, we continued to take off the railing and panels. I went to check about paint and borrowed an electric pressure washer to clean the pontoons so Wain could assess where our leak was. We soon discovered that the electric washer would not do the trick as quickly as I had hoped. So, my dad and I are now the proud owners of a 2700 psi gas-powered pressure washer. That night, I finished spraying the grime off of the pontoons. Washing the outer sides of the pontoons was no problem, but washing them on the insides underneath the trailer made it a miserably wet and uncomfortable process.

Day 5: Saturday, July 24

We met Jerry at the boat at 7am. While he assessed the motors, we scraped the sides of the boat. Fortunately, the engine work will be minimal, at least when compared to the rebuilds we feared. That afternoon, we went to a birthday party at the Trail of Tears park in the Shawnee National Forest. It is absolutely beautiful there.
Culprit #1: Crack in side of Pontoon that Allowed Water to Reach Culprit #2

Culprit #2: Crack (center of photo) on Top of the Pontoon

Day 6: Sunday, July 25
Today has been the most pleasant day (weather-wise) so far. This morning we scraped the panels. Around 10:30am we went to the boat to begin supporting decking. Wain and (another) Jerry finished welding the cracks in the pontoons. As you can see from the photographs, the spot where they had to weld supports is where the engines are attached. They had not been attached properly and had been pulling on the old welds. We took measurements for boards to support the rest of the flooring and headed back to the house. Right now, we've been resting and I've had enough time to update this blog. I'll continue to post updates as the restoration progresses. Here's to Moby Dick.

The Naked Boat (Let's Hope She Looks Better in a Week)

Monday, June 7, 2010

Becoming Boat People


Oh, Captain...
My in-laws have just bought a houseboat located at nearby watering hole, and we couldn't be more excited. It's a 40' 1967 (I'll say "vintage" to make it sound cooler, which it is) model that will need some cosmetic surgery. Basically, the price was right (it's a fixer-upper) and no one could resist.

Amidst the exciting visions of BBQs on the deck, relaxing afternoons strolling around the lake to find the perfect cove, and beating the heat with dips in the lake, I've been looking around the web for ideas. That is, just what exactly do these houseboat people do, exactly (especially those who have restored affordable models)? As way of an introduction to what will no doubt be a nasty habit of browsing the web, here is what I've found so far. (Hopefully, these will be the resources the inspire the a successful restoration.)

Solar Power. The slip (i.e., parking spot) included with the boat does have electrical and water hookups. This is not to say, however, that you would have the modern convenience of an electric fridge while parked in a cove. Solar or wind power seem like an obvious choice, and Wholesale Solar just so happens to have packages for the energy needs of a boat.

Blog Inspiration. I found a blog chronicling another happy camper's (or rather boater's) journey to restore a '43 yacht. The entries at Must Be Nice chronicles the progress on an 80s model and a totally different design, but inspirational none the less.

Keeping it Modern. Admittedly, my father-in-law will want to have a Jimmy Buffett or Log Cabin aesthetic for any remodeling, and as long as we get to enjoy the houseboat that's fine with me. Regardless, it was nice to see that there are renovations leaning toward the uber mod out there: Inhabit (hmmm...a roof garden), Sunset, and Metroshed (including interior layouts).

Furniture Inspiration and Design. Outdoor furniture is just one of the many appealing designs provided at a few new finds: 6 Different Ways, Extremis, Greenform, and Furniture Fashion.

I'll try to provide updates to my restoration progress along the way. Here's to happy boating (and the hope that I finally learn how to pull the boat into the slip without too much chaos...I'll leave that story for later).

Thursday, June 3, 2010

Growing food and community (and chickens in town, we hope)

All things food and community have been under way this spring in SO IL. Two months ago, the local farmer's market opened for the season, and last month we started receiving our weekly CSA (Community-Supported Agriculture) deliveries from Clearcreek CSA. A bonus with the CSA this year is visiting with the other members each week. We volunteered our house to be the drop-off/meeting point for the bi-weekly deliveries. Stocked with a cooler full of beverages and the occasional homemade fixings, we've been able to enjoy visits with Adam and Anne (Clearcreek proprietors) and the CSA members who have the time to visit. It's amazing how well a "cooler full" can coax a person to sit down and chat for thirty minutes or so. Who says barley and hops can't build community?

On other things food related, we're still anxious to hear the city council's decision about raising hens in town. Last February, there had been some press in the local paper about the matter (even the addition of miniature goats to the proposed city ordinance apparently made oh-so-informative USA TODAY), but it's been pretty quiet lately. Regardless, I've been looking for chicken coop ideas. Fortunately, there are even a few ideas out there with a modern/contemporary aesthetic. For example, Modern Coop uses reclaimed cedar. (Well, well, well...it so happens that I have a leftover cedar board or two from the finished courtyard fence--I'll make a post about that one soon). The Cocorico Hen House also got me thinking about alternative uses for the super-flexible PVC pipes used for outdoor electrical conduit. Other store-bought varieties are produced by Omlet in the UK and the stateside ChickenCribs. Oh, the possibilities.

Cocorico Hen House by Maxime Evrard via Yanko Design

Friday, April 30, 2010

Bucky Would Be Proud: Emergency Shelter Design at SIU

This week, the walkway along Faner Hall at Southern Illinois University has been graced with the work of--what I assume are--student designs for emergency shelter. It appears that the requirement for the project was to create an easy-to-assemble shelter out of plywood and a blue tarp that collects rain water. Other than the mock-up display boards that accompany most of these designs, there is little evidence of who created these gems or why (other then the assumed super-cool, socially-relevant class project). Regardless, I am glad to see that the tradition of design from simple materials, a concept that our own Bucky Fuller practiced here at SIU, continues. Here are a few highlights of our favorite designs.


Wednesday, April 21, 2010

Mac & Lucy Travel to Japan


In 1960, my great grandparents embarked on a guided world tour. I am fortunate to have their travel diary and the thousands of slides (from this trip and others) my great grandfather took with his Leica camera. We've been scanning the slides to digital images, and I thought I would share a few highlights from their travels in Japan.

Tuesday, April 20, 2010

Projects (Small, Large, and Mostly Incomplete)

It's been over a month since my last post. Since the winter holiday break, the time I have had to work on the house has been limited, to say the very least; however, there have been a few opportunities to get in an hour here and there. Instead of waiting to make a post when the countless projects are finished, I decided to give an "in progress" update. (Perhaps looking back at the rough conditions these items are in at this point will make me even more appreciative--I hope--of the final product.)

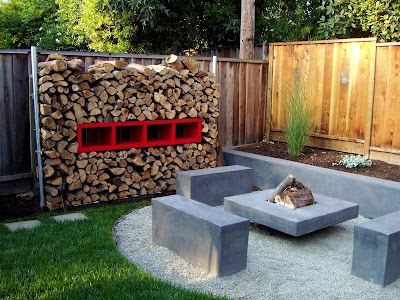
MODERN LOG HOLDER (status: need to construct and paint center "element")
Several years ago, I grabbed this inspiration photograph off the web. This was a time when I was new to modern home design and desperate to find any ideas online. It was also before I ran across (or even considered the possibility of) resourceful blogs. During the holiday break, I decided the 20-degree weather was no reason to stay inside. I built the bottom "sled" out of scrap wood and attached cables at both ends to serve as inconspicuous supports (the inspiration design has posts instead). Right now, the logs are stacked, and all I need to do is build and paint the rectangle "element" for the middle. I imagine I'll use the left over orange paint we used for the front door.
INSPIRATION PHOTO

Inspiration photo via... (I lifted it from the web in 2007 but don't remember where)

Working in 20-degree weather is a good excuse for a fire

Photo of cable supports attached to ceiling of overhang

FRONT COURTYARD FENCE (status: need to paint posts as well as stain and attach cross pieces; redirect and rewire new lights; weld, paint, and attach new gate)
We've been really missing our front courtyard fence. The old one was totally shot due to dry rot. Instead of painting it the new house color, I decided to tear it out last fall and wait until spring for a proper replacement. (I uploaded inspiration photos in a previous post.) The time has come, and though the progress has been slow, we should see this project completed next month. The bonus will be the addition of gate. I have a design in mind; I just need to see if I have some brother-in-laws willing to help me with the welding.

Construction begins on the fence with new posts set in concrete
Design idea for front gate (correction: cut pipes crosswise, not lengthwise)

Friday, March 12, 2010

St. Louis in Spring (or, well, late winter)

Ok, so it's been awhile. The last post was two months ago, and I have a lot of catching up to do. We've been busy working, getting the garden together, completing an endless list of house projects, and finding time to enjoy the end (I hope) of winter.

This week is spring break here, so yesterday we decided to get in our St. Louis fix. It was a perfect day for visiting old favorites and some new spots. First up was lunch at Pho Grand. Last year, Sauce Magazine listed it as the best Vietnamese Restaurant in St. Louis. Our meal was ok. I just think we need to explore the menu a little further next time. We had asked for suggestions, and it seemed like we got the lowest common denominators (i.e., mild beef dish and a basic chicken curry). Why we didn't opt for something with lemongrass, I have no idea.

Next, we headed to The Future Antique. We've been in search of a mid-century china cabinet, and I think we found a winner. (More on that later.)

via TFA

Then, we headed over to a garden supply store I read about in a recent issue of Organic Gardener. Bowood Farms is an amazing space (converted from an old auto garage) with a fantastic restaurant, Osage Cafe. For the garden, we picked up asparagus, red potatoes (no fingerlings, unfortunately), rhubarb, arugula, and onions. We also had a mid-day snack. It was the perfect stop and a place we'll visit again. By mid-April they should have chili pepper starters (just in case my seeds don't take off).


Next, we headed to The Loop area of Delmar Avenue. What a great spot. Our favorite stops are City Sprouts and Star Clipper.

Finally, we ended the day with our Trader Joe's run. We had considered having dinner at Schlafly, but decided to get home a little earlier. That night, we curled up with the latest issue of Sauce Magazine and planned our next culinary adventure in the Big Brick City.

Wednesday, January 13, 2010

"Simple" Lighting

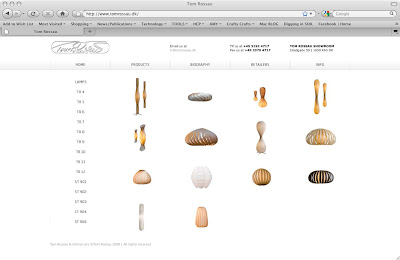
A recent post on Contemporist reveals how Tom Rossau builds one of his amazing lights with strips of veneer. Although this design is a bit more complex, it is easier to see from his other designs just how feasible it would be to make one of these lamps. Hmmm....


via Tom Rossau

Or...just buy something for less money (and less time) at the Scandinavian Design Center. Their prices on some lighting options are pretty hard to beat.

Saturday, January 2, 2010

Dreams of a Brick Oven


Imagine a full day of cooking--or rather, baking--in the backyard. First, the pizzas, then breads, then cobblers. This is what makes having a brick oven very appealing, and here are the resources I've found for inspiration thus far. There is a perfect spot in the backyard just begging for "proper" use. hmmm....

The two books that have inspired a lot of folks out there are Your Brick Oven and The Bread Builders.

And here are a few links for inspiration:

1) Brian's Brick Oven Folly - Plenty of pictures and helpful tips, especially the detailed images of how the brick oven actually works.

2) Frankie G's Wood-Fired Pizza Oven - More pictures. Similar techniques as above for forming the domed oven interior.

3) Matt Considine: Building a Brick Oven - The most comprehensive site, as far as photographs go, for the entire process. This makes the project seem a little too daunting.

4) Gulland Oven - Here's a relatively simple design for the base and an oven the apparently does not need a chimney.

5) Mike's Brick Oven - Igloo design.

6) Forno Bravo - Ok, so maybe with the (limited) time and (little) patience I really have, buying an oven would be a more realistic alternative. I would still have to assemble a base with the modular option, or go the easy (and more expensive) route with the assembled one.

7) Superior Clay 36" Oven - Another purchase option.