Showing posts with label exterior. Show all posts

Saturday, July 12, 2014

My Version of a Kids' Play Structure


The Challenge:
I had a lot of wood I couldn't burn inside (i.e., cedar and pine), and I wasn't able to burn it fast enough in the outdoor fire pits. We also adopted a slide from grandparents and need to put it to use or give it away. I didn't want a monstrosity of a structure dominating the yard, so I came up with my own design with nontraditional materials, I suppose.

The Solution (for now):
I added a second log stack (supported/flanked by 4 t-posts) and connected it to the existing (taller) one with a pre-cut, 3-step staircase. I used standard posts for railing, leftover cedar shingles (from roofing the adjoining hut) for a small shelter on top, and tongue-and-groove cedar for the floor.


To access the slide, I staggered longer logs on the back to serve as climbing steps (above). I also added a climbing wall (below) as a second access point for the covered tower (on top of the taller log stack). I connected climbing holds to signboard (MDO, not to be confused with MDF) with the usual 3/8" t-nuts. The planters in front of the stacks is a nice addition for summer snacking on tomatoes and mint.


Overall, I'm happy with the results. It was a good use of the materials I already had, and the smallest members have given their seal of approval. I am told the tower "is the perfect reading spot" and great for relaxing out of the sun. The biggest challenge was positioning the log stacks so the pre-cut stairs would line up. A little 10th-grade geometry came in handy--thanks Mr. Herder.

- Posted using BlogPress from my iPad

Thursday, May 24, 2012

"Tree" House

Another amazing spot we found in St. Louis is the Missouri Botanical Garden. Last summer, they hosted a special event, "Extreme Tree Houses." Local designers and architects created unique structures, many from upcycled and recycled materials, that adorned the already amazing grounds. I always love going places that are inspiring, in a design sense. In some cases, I feel inspired (and bold) enough to say, "Let's try to build one of those."
Prior to the visit, I had been drawing up planes for an uber-modern playhouse for the kids--think corrugated sheets of metal hung horrizontally on a simple rectangle structure.
Then I saw this....


I was in awe of the simple, yet smart, design. The skeleton of bent boards provided an excellent frame for weaving branches to form organic walls. As you can see from the photo above, they also bent branches for arched doorways.
This was it. Instead of buying and cutting up a lot of materials with scraps that would end up in the dump, why not upcycle the branches that always fall in our yard after a storm? Further, we are always trimming back overgrown branches from various vegetation. Instead of paying to have them hauled off (and hopefully ground up for composting), I would have a continuous supply of materials.
The next weekend I got started. (Like I said, I was pretty inspired.) Below is my version that is the result of months of casually weaving branches as they became available in the yard. (Next to the hut is a stacked wood climbing wall with holds.)


So how was it done? The most important piece is the top that holds the bent frame. Below is a photo of what I came up with for this "cap." Eight thin boards were attached to this top to create what looks like a giant spider.


To get boards that are pliable enough to bend without breaking, I ripped leftover 10-foot, treated (not the greenest or toxic-free option, I realize) 2x4s into half inch strips. I then created a makeshift "tub" out of a tarp to soak them for about 30 minutes (see photo below).


After I connected the boards to the top frame ("cap"), I measured out evenly spaced stakes for attaching the bottoms of these boards. I also placed pavers in the top of the "cap" to weigh it down and create a yurt-like structure instead of a cone. (The wet boards makes this more possible.) After that, it's preparing the roof for cedar shingles and creating frames for weaving a lot of branches.


I'm pleased with the results. The house continues to evolve as we add more branches to strengthen and thicken the walls. The organic look works just fine with a modern aesthetic, and more importantly, the kids love it.

Tuesday, April 20, 2010

Projects (Small, Large, and Mostly Incomplete)

It's been over a month since my last post. Since the winter holiday break, the time I have had to work on the house has been limited, to say the very least; however, there have been a few opportunities to get in an hour here and there. Instead of waiting to make a post when the countless projects are finished, I decided to give an "in progress" update. (Perhaps looking back at the rough conditions these items are in at this point will make me even more appreciative--I hope--of the final product.)

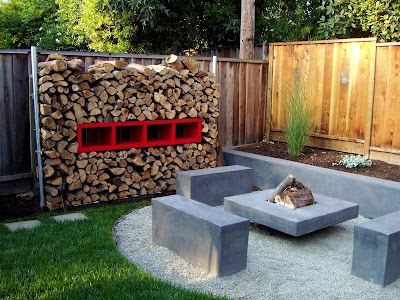
MODERN LOG HOLDER (status: need to construct and paint center "element")
Several years ago, I grabbed this inspiration photograph off the web. This was a time when I was new to modern home design and desperate to find any ideas online. It was also before I ran across (or even considered the possibility of) resourceful blogs. During the holiday break, I decided the 20-degree weather was no reason to stay inside. I built the bottom "sled" out of scrap wood and attached cables at both ends to serve as inconspicuous supports (the inspiration design has posts instead). Right now, the logs are stacked, and all I need to do is build and paint the rectangle "element" for the middle. I imagine I'll use the left over orange paint we used for the front door.
INSPIRATION PHOTO

Inspiration photo via... (I lifted it from the web in 2007 but don't remember where)

Working in 20-degree weather is a good excuse for a fire

Photo of cable supports attached to ceiling of overhang

FRONT COURTYARD FENCE (status: need to paint posts as well as stain and attach cross pieces; redirect and rewire new lights; weld, paint, and attach new gate)
We've been really missing our front courtyard fence. The old one was totally shot due to dry rot. Instead of painting it the new house color, I decided to tear it out last fall and wait until spring for a proper replacement. (I uploaded inspiration photos in a previous post.) The time has come, and though the progress has been slow, we should see this project completed next month. The bonus will be the addition of gate. I have a design in mind; I just need to see if I have some brother-in-laws willing to help me with the welding.

Construction begins on the fence with new posts set in concrete
Design idea for front gate (correction: cut pipes crosswise, not lengthwise)

Saturday, January 2, 2010

Dreams of a Brick Oven


Imagine a full day of cooking--or rather, baking--in the backyard. First, the pizzas, then breads, then cobblers. This is what makes having a brick oven very appealing, and here are the resources I've found for inspiration thus far. There is a perfect spot in the backyard just begging for "proper" use. hmmm....

The two books that have inspired a lot of folks out there are Your Brick Oven and The Bread Builders.

And here are a few links for inspiration:

1) Brian's Brick Oven Folly - Plenty of pictures and helpful tips, especially the detailed images of how the brick oven actually works.

2) Frankie G's Wood-Fired Pizza Oven - More pictures. Similar techniques as above for forming the domed oven interior.

3) Matt Considine: Building a Brick Oven - The most comprehensive site, as far as photographs go, for the entire process. This makes the project seem a little too daunting.

4) Gulland Oven - Here's a relatively simple design for the base and an oven the apparently does not need a chimney.

5) Mike's Brick Oven - Igloo design.

6) Forno Bravo - Ok, so maybe with the (limited) time and (little) patience I really have, buying an oven would be a more realistic alternative. I would still have to assemble a base with the modular option, or go the easy (and more expensive) route with the assembled one.

7) Superior Clay 36" Oven - Another purchase option.

Wednesday, December 9, 2009

House Color

We finished painting the house a couple of months ago, and I am finally posting some pictures. Here's a glimpse. The final selections of Intellectual Gray and Charcoal trim (see previous post) coordinate perfectly with the stone accents. We are also diggin' the orange door. Enjoy.

Friday, October 16, 2009

Front Courtyard Inspiration

The house painting is nearly complete. (I'll post some pics soon.) Now, we need to concentrate on demoing and replacing the tired old red courtyard fence. The prospects of creating a great hangout area is quite enticing. In fact, I recently put up cord lights (hidden under the eves so it doesn't look like we left our Christmas lights up), and they give off a nice moonlit-like glow. Here are some inspiration photos for our courtyard from the web.

Basic Fence idea via Trick my Brick

Inspiration for up-lit plantings in front of fence via Contemporist

You gotta have a fire pit! Contemporary log dwelling from AK47